Showing posts with label Cakes. Show all posts

Tuesday, May 13, 2014

Easy Peasy Apple Cake


I’m a sucker for sales.  Every time I see a “buy one get one free” sign, before you can even say ‘sucker’, I’m at the till handing over my cash! 

I bought 2 large packs of apples a couple of weeks ago.  Yep, you know it, buy one get one free!  While the whole family loves apples, we’re starting to get a bit tired of them.  2 weeks later, there are still a couple of apples turning slightly soft and wrinkly in the fruit bowl!  Perfect for apple cake! 

Anyway, I love this recipe which has been adapted from another recipe that a friend passed on to me on a scrap piece of paper.  It’s quick and it only takes 1 bowl…well, 2 if you use another bowl for weighing your ingredients….oh and a measuring cup….and a spoon….ok, there’s still a bit of washing up to do! J  Plus, with all that apple in the cake, it’s ‘almost’ healthy!

Tuesday, October 30, 2012

The 7hr saga of a pig (dodgy photo alert!)

It wasn’t just any pig, it was Peppa Pig!  If you have a toddler and live in the UK, it is very likely that you have been acquainted with Peppa Pig.  An adorable little pig who likes jumping in muddy puddles (all the time to some very annoying music in the background). 

Daughter no. 1 was obsessed with Peppa Pig when she was about 2 years old.  Daughter no. 2, slightly obsessed but not to the same level luckily.  Our house is filled with Peppa paraphernalia and various bits of Peppa plastic.

Needless to say, when it was No. 2’s 2nd birthday, she wanted a Peppa Pig cake! 

Now, my attempt at a Peppa Pig cake for no. 1 looked like this. 

Not great.  I so wasn’t impressed with it that I only took about 2 photos of the cake.


I was determined to get it right this time around.  Absolutely determined. 

Sunday, September 02, 2012

Spark of vanilla

Coming back from holidays is hard.  Summer holidays are especially hard.  On this side of the world, the days are getting shorter, the mornings are getting cooler and I’m starting to think about having to sew those name tags on the uniforms for school – not for me, for my big little monster who’s starting school this year. 

It’s all kind of depressing really.
Then, a dim spark of hope lies in the form of VANILLA CAKE!  Okay, maybe I’m being a little over-dramatic but I love VANILLA CAKE!  I especially love VANILLA CAKE with SWISS MERINGUE ICING.  Sorry I’ll stop shouting now.

Sweetapolita is my go-to blog for vanilla cake recipes.  For this cake I used this recipe, which is what I would call a topsy-turvy method of making a cake.  I’m used to creaming butter and sugar, adding eggs and then any other liquid and finally gently mixing in the dry ingredients.  This method calls for mixing the butter with the dry ingredients and then mixing the wet ingredients in.  It seemed almost easier than the standard creaming method with amazing results.  Amazing (had to say it twice). 
And the icing, oh the icing.  Not an overly sweet, slightly gritty buttercream but a light and smooth swiss meringue buttercream.  It takes a little longer to put together but the results are absolutely lovely.  It seems so light that you forget that it’s almost pure butter!
And the resulting cake?  Moist, light, a mouthful of vanilla-ey sunshine.  Definitely something to make the shorter days a little longer J
Notes for the cake: I replaced the cake flour by putting 2 tablespoonfuls of cornflour into a cup and then filling it up with ordinary plain flour.  I also only used a pinch of salt instead of the ¾ teaspoon of salt.
Notes for the icing: I halved the quantities in the recipe and still had some leftover.  This was my first time making swiss buttercream and I was a bit vary of using raw egg whites hence I used pasteurised egg white powder instead of fresh egg whites.  The buttercream still came together quite well.
5 giant yums for this recipe J

Monday, July 02, 2012

Delightful vanilla-raspberry cupcakes


Sometimes I just want sugar.  Any form.  Any colour.  When there’s nothing in the cupboards, I absolutely just have to bake something.  Anything.  Anytime.  I’ve been known to make cakes at midnight…and eat them an hour later.  Sad I know.

One of my favourite vanilla cupcake recipes based on the vanilla fairy cake recipe from the Peyton and Bryne British Baking book.  It’s an easy and quick recipe which produces a light and relatively moist crumb.

I also threw in the squishy raspberries  from the back of the fridge that no one wanted to eat.

This is what I used:
100g softened unsalted butter
175g home-made vanilla sugar
2 medium eggs
150 self-raising flour
2 tsps vanilla extract (I like a strong vanilla hit)
60ml natural yogurt
Roughly 150g of squishy raspberries
12-hole cupcake tray lined with 12 cupcake cases

What I did:
1. Line cupcake tray with cupcake cases

2. Preheat the oven to 170C

3. Cream the butter and sugar until pale, light and fluffy using an electric appliance if you still want to have some feeling left in your arm after this

4. Add the eggs to the creamed butter and sugar and mix well

5. Add the vanilla extract and yogurt to the batter and mix well (lots of mixing going on…)

6. Fold the flour into the batter

7. Drop 1 to 2 raspberries into each hole in the cupcake tray.

8. Fill each cupcake case two-thirds full

9. Bake for about 15 minutes or until a skewer comes out relatively clean.  A few crumbs might cling to it but it should be fine.

10. Dust with icing sugar or decorate as you please

The cupcakes smelt beautiful while cooking and came out a little sunken due to the moisture in the raspberries – so I hid them under a mountain of …raspberries!
Heaven. 
Anyone else with a sugar addiction?

Sunday, May 27, 2012

Pat-a-cake, pat-a-cake...


I think I’m going to have to admit it. 
I’m addicted to eating cake! 
I’ve been eating cake almost non-stop for nearly a month.  At the rate I’m going, I will have to go on a lettuce and water diet for the next 6 months to counter the negative effects of too much sugar and fat.
My daughter wanted a chocolate cake for her birthday cake.  I have never been able to make a decent chocolate cake, one which is moist yet firm enough to carve.  Most of my chocolate cakes turn out relatively dry when they come out of the oven and extra dry by the next day so it almost feels like you’re eating a mouthful of dust! 
After experimenting with at least 4 different recipes (and yes, eating most of the products despite the mouthfuls of dust!), I finally stumbled across the the perfect chocolate cake recipe by Lindy Smith.  Perfect for me anyway.  This recipe came out moist and stayed moist for nearly a week!  Plus it was really easy to make.

I tried adding glycerine (1 teaspoon) to the cake after reading that it can help keep the cake moist for longer on Cake Central somewhere (don’t really know how this works scientifically – too lazy to search), but I found that it didn’t seem to make that much of a difference for me.  Keep in mind that I tried 4 recipes – each recipe twice - once with glycerine and once without.  That’s 8 chocolate cakes!  Ok – maybe I’m a little bit obsessed…just a little.

Anyway, here’s the chocolate cake all prettied up for the party.


Monday, May 21, 2012

The Kitty

After the blood, sweat and tears that I shed over the Penguin, these Hello Kitty cupcakes only required some sweat.  Just a little.

No blood or tears involved at all. 
However I was armed with a secret weapon. 

Tuesday, May 15, 2012

The penguin

I’m not a talented baker.  I’m not even really a very good baker.  I am however, an obsessive baker.  Once I start, I just can’t stop.  I have to get things right even if it means that I have to make the same chocolate cake over and over again until I get it to a texture and taste that I want.  However this isn’t about chocolate cakes (that will come later).  This is about Peso the penguin.

Peso peso 
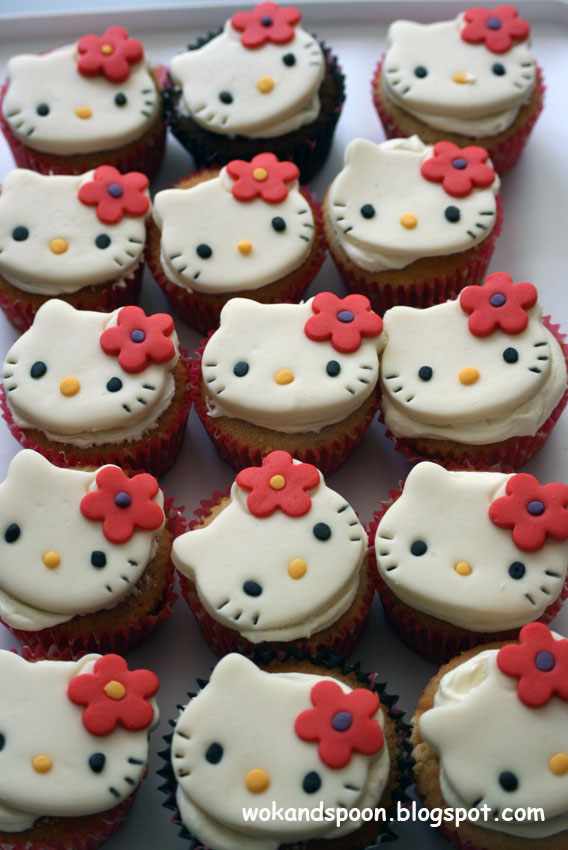
peso.  Why did I make Peso?  Well my 4 year old was sharing a birthday party with one of her little friends.  As I was making a load of Hello Kitty cupcakes for my 4 year old (her favourite character) I felt it was only fair that I made cupcakes for the other little girl as well.  And she chose Peso!
Briefly, this is how I made them. (Ps. excuse the dodgy photos.  I was working late at night under dim kitchen lights).
First things first.  
Sugarpaste.  To buy or not to buy?  I didn’t buy.  I made.  Extra work, but bought ready-made  sugar paste, in my opinion, has a weird smell and aftertaste.  So I had to make my own.  From scratch.
After a long hard search through the internet, I found this recipe.  It’s a bit of work but so worth it!  I ended up with a nice big lump of off-white sugarpaste – roughly 2 kgs of it!  That’s a lot of sugar.
Next thing. 
Black sugarpaste
I tried to colour the off-white sugarpaste black but ended up with a big grey mess and sticky grey hands.  So I made chocolate sugarpaste – also from the same recipe.  I then mixed half of the chocolate sugarpaste with black ready-made sugarpaste that I bought.  This ended up a nice dark nearly black colour with a decent flavour.

Then the easy bit, I rolled the black sugarpaste, cut round circles using a cookie cutter and stretched the circles slightly so they became ovals.

Here’s the hard part.  I then found a Peso face on the internet, printed it and then traced it onto greaseproof paper and cut it out.  I manually cut out 16 (yes, sixteen!) faces…and 32 eyes…and 16 noses…and 16 hats…and rolled 32 eyeballs.
Once all of this was done, I put it all together with some sugar water. 

And voila, there you have it.  16 freaky little Peso faces staring at you.  Just pop them on a few cupcakes and you're ready for a party.

Related Posts Plugin for WordPress, Blogger...